Introduction
If you’re a VTuber or streamer using VSeeFace, you may have noticed a small camera light or indicator that appears while your camera or virtual camera is active. While this feature is useful for ensuring that the camera feed is functioning, some users prefer a cleaner display or want to hide the light for privacy or visual reasons.
Understanding how to remove camera light on VSeeFace can help improve your visual presentation and make your setup look more professional.
In this guide, we’ll go through step-by-step instructions and explore different ways to disable or hide the camera indicator in VSeeFace. Whether you’re new to VTubing or an experienced creator, this article will help you handle the camera light issue effectively.
Understanding the Camera Light in VSeeFace
The camera light in VSeeFace usually refers to a small overlay or icon that appears when your webcam or virtual camera is running. Its main purpose is to show that the camera feed is active. Sometimes, it may also refer to your hardware webcam’s physical light, which turns on whenever the camera is in use.
This indicator serves as a safety feature, but for content creators who want a “clean screen” during capture, it can be distracting. Learning how to remove camera light on VSeeFace involves identifying whether the light is a software indicator within the app or a physical webcam light controlled by your operating system.
Pre-Check: Version, Settings & Permissions
Before you start removing or hiding the camera light, make sure your VSeeFace software and webcam drivers are up to date. This ensures all settings are accessible and minimizes the risk of technical issues.
You can check your version by opening VSeeFace and selecting the About tab. Update it if a newer release is available. Also, confirm that your camera permissions are correctly set in Windows or macOS to avoid detection issues once you modify settings.
Using Built-In Settings in VSeeFace
The easiest way to remove or hide the camera indicator is by using VSeeFace’s built-in options. Follow these steps carefully:
- Open VSeeFace.
- Navigate to Settings.
- Click on General Settings.
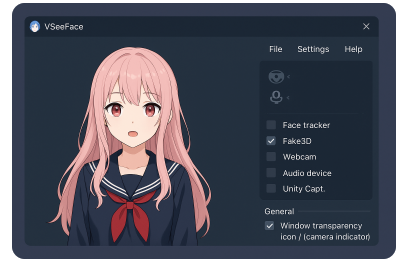
- Look for the option labeled “Window transparency icon / (camera indicator)”.
- Turn this option off.
Once disabled, the camera indicator should no longer appear while your camera is active. This setting works well for most users and doesn’t affect performance or camera tracking.
Advantages of this method:
- Simple and direct approach.
- Doesn’t require external tools.
- Keeps the rest of your interface functional.
Disadvantages:
- Some older VSeeFace versions may not include this option.
- The hardware camera light (if present) may still turn on.
Alternate Workarounds When No Built-In Setting Exists
If your version of VSeeFace doesn’t have the camera indicator toggle, you can still achieve the same result with simple workarounds.
1. Adjust the Display Capture in OBS or Other Software
When recording or streaming, use software like OBS Studio. You can crop the capture area to exclude the part of the window where the camera light appears.
2. Use Transparency or Overlay Settings
Try minimizing window overlays in VSeeFace. You can also switch to “clean window mode,” where only the avatar is visible without additional UI elements.
3. Hide or Mask the Light Using a Graphic Layer
Some creators use a small graphic overlay in OBS (like a logo or corner decoration) to cover the light indicator seamlessly during broadcast.
These workarounds are helpful if your software version doesn’t have a direct disabling option. They provide flexibility and maintain your preferred visual layout
Advanced Option: Removing Virtual Camera Indicator
Sometimes, the “camera light” people refer to is not the on-screen icon but rather the virtual camera driver indicator that shows your webcam is being used. In such cases, you can manage this through the installation files.
- Navigate to your VSeeFace installation folder.
- Go to
VSeeFace_Data\StreamingAssets\UnityCapture. - Locate the file Uninstall.bat and run it to remove the UnityCapture driver.
- Restart your computer and open VSeeFace again to confirm the virtual camera driver is disabled.
This approach is more advanced but can help if you suspect the light is coming from the virtual camera driver rather than the app interface itself.
Troubleshooting Common Issues
Even after changing the settings, some users report that the indicator still appears. If this happens, consider the following troubleshooting tips:
- Restart VSeeFace after making changes. The setting may only take effect after rebooting the app.
- Differentiate between hardware and software lights. If your webcam has a physical light, disabling it usually requires adjusting hardware settings or covering it manually (though not recommended for safety reasons).
- Check your capture setup. Sometimes the light may appear because your OBS or recording software is capturing the entire VSeeFace window instead of the avatar section.
- Update your drivers to ensure compatibility.
If you experience tracking issues after disabling the indicator, you can re-enable the feature temporarily to test camera functionality.
Table for Quick Reference
| Step | Description | Notes |
|---|---|---|
| 1 | Open VSeeFace and go to Settings | Access General Settings menu |
| 2 | Disable “Window transparency icon / (camera indicator)” | Removes the on-screen light |
| 3 | Use OBS cropping or overlays if needed | Alternate method for older versions |
| 4 | Manage virtual camera driver via UnityCapture folder | Advanced fix for driver indicator |
| 5 | Test after changes and restart | Ensures correct setup |
Best Practices for a Clean Stream
After you’ve learned how to remove camera light on VSeeFace, remember that keeping your setup organized helps maintain a professional appearance. Use proper lighting, ensure your avatar tracking is aligned, and keep the interface clutter-free.
Additionally, while hiding the indicator can make your stream look neater, always ensure that your camera is functioning correctly before you go live. Conduct a brief test recording to verify that your avatar moves naturally and that the software detects your expressions accurately.
Summary
Removing or hiding the camera light in VSeeFace is a simple yet effective way to enhance your streaming setup. By using the built-in General Settings toggle or applying capture workarounds, you can achieve a clean, professional appearance without disrupting your camera tracking.
If you encounter any issues, reviewing your virtual camera driver and ensuring the latest software updates can resolve most problems. Once done, your VSeeFace display will look smoother, cleaner, and more visually appealing for viewers.
FAQ
Q: Does removing the camera light affect VSeeFace tracking?
No. The camera light indicator is just a visual cue and does not affect tracking performance.
Q: Can I remove the physical webcam light?
Most webcams have hardware-level lights that cannot be turned off for security reasons. It’s best to leave them as they are.
Q: What if I don’t see the “camera indicator” option?
Make sure your VSeeFace is updated to the latest version. If not available, use OBS cropping or overlays to hide it manually.
Related Articles
Canon PowerShot ELPH Digital Camera Guide
Camera D600 Nikon: Full Review, Features, Specs, and Buying Guide for Beginners & Enthusiasts
Yashica Camera Mat 124 – Complete Guide, History, Features, and Why It Still Matters
St. Pete Beach Cameras – Live Views, Top Spots, and Real-Time Beach Experience